The Story
Matzah is a Passover classic. While some people think that it’s sub-par to a biscuit’s butter goodness and not as tasty as saltine’s saltiness, I think there’s something to be said about the simplicity and versatility of matzah. It really is a simple food.
And it’s perfect for snacking. I enjoy it as a makeshift peanut butter and jelly sandwich (a little bit of peanut butter on one piece, a little bit of jelly on the other), with some sardines on top (don’t hate it until you try it, especially if you like sardines), or toasted with a little bit of salted butter (stop what you are doing right now and go try it).
But as dessert?
Well that’s obvious. COVER. IT. IN. CHOCOLATE.
And then top it in whatever you want. The recipe below is simple to follow, and shows you countless ways to decorate and coat these puppies.
SHOUT OUT TO MY SISTER FOR COMING UP WITH ALMOST ALL OF THESE IDEAS.
Get the kids involved too. Because Passover is meant to be spent together.
chag kasher v’same’ach (חַג כָּשֵׁר וְשָׂמֵחַ)
Ingredients
Matzah (enough for eating)
Chocolate (enough for coating. 1 cup chocolate chips will get you 5-10 large pieces of matzah coated)
Vegetable Shortening (for thinning chocolate, if needed)
Toppings
The Detailed Guide
Coating
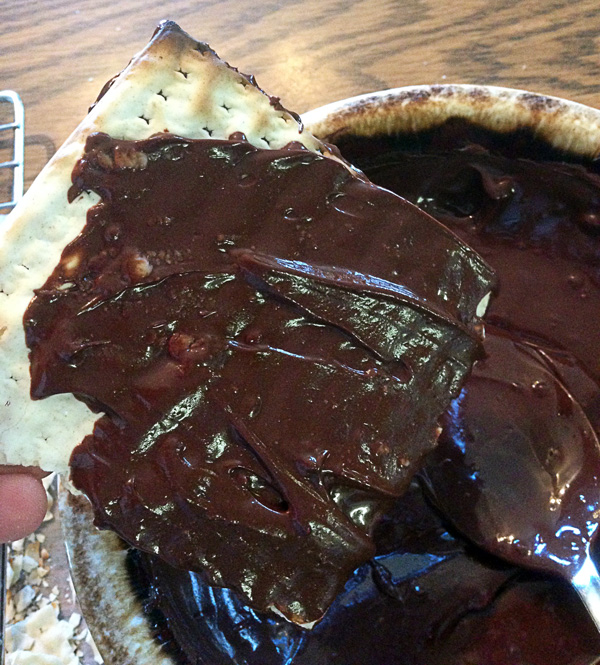
Melt chocolate in the microwave, using vegetable shortening to thin it, if necessary.
Using a spoon, coat one side of the matzah with your chocolate.
I found that a spoon was easier to coat with than any other utensil. I also found it easier to coat the chocolate rather than trying to dip an entire piece of matzah in chocolate. You’d risk breaking the matzah, and that would require too much chocolate in the bowl.
I also only coated one side of the matzah, rather than both. If we coated the bottom, chocolate would get all over people’s hands when they get to pick these up. Coating only one side keeps the mess to a minimal. Also it keeps drying time down.
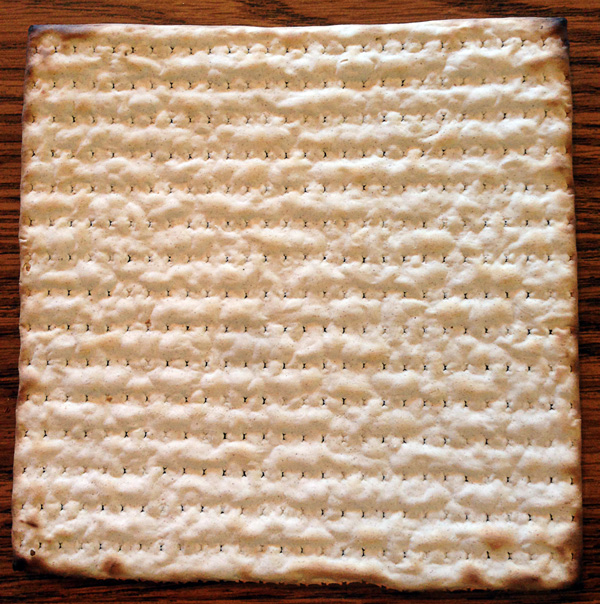
Start with one large piece.
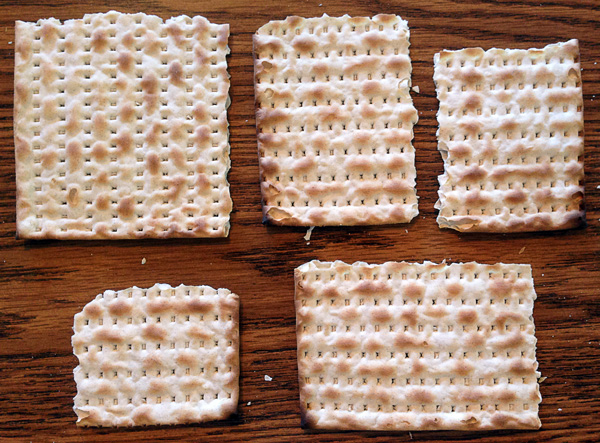
Break into piece. Large. Small. Wide. Square.
Coating it yourself, rather than dipping the whole piece in chocolate, is easiest.
Topping
Think about your toppings beforehand.
If you’re topping with things like nuts or chocolate or anything that you want to stay on top of the matzah, coat while the chocolate is still wet.
If you’re topping with things like a peanut butter drizzle or white chocolate or jam, wait till the chocolate coating is dry before adding these.
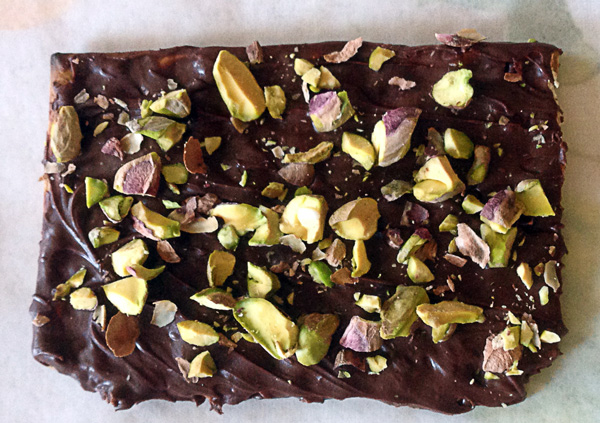
Fresh chopped Pistachios. Mmmmmmmm!
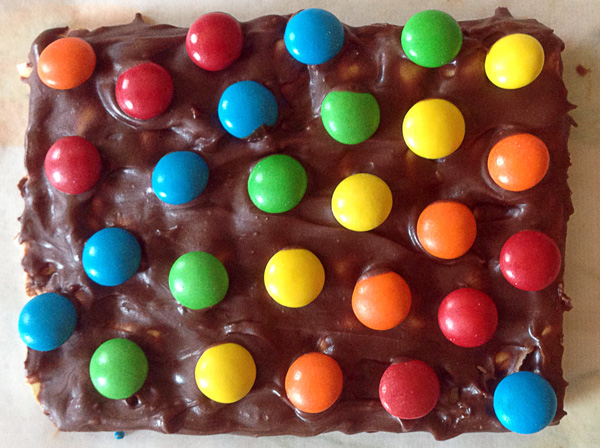
M&Ms for the kids! (or the kid in you)
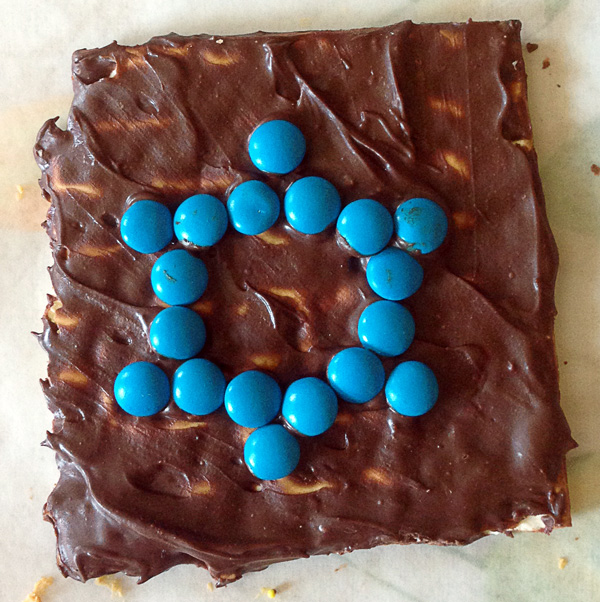
Don’t forget you can decorate as you like 
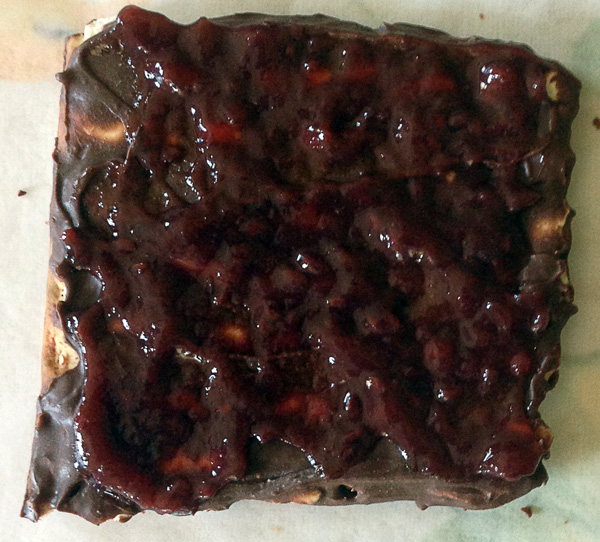
Jam! Any flavor. I went with raspberry, but grape or strawberry sound divine.
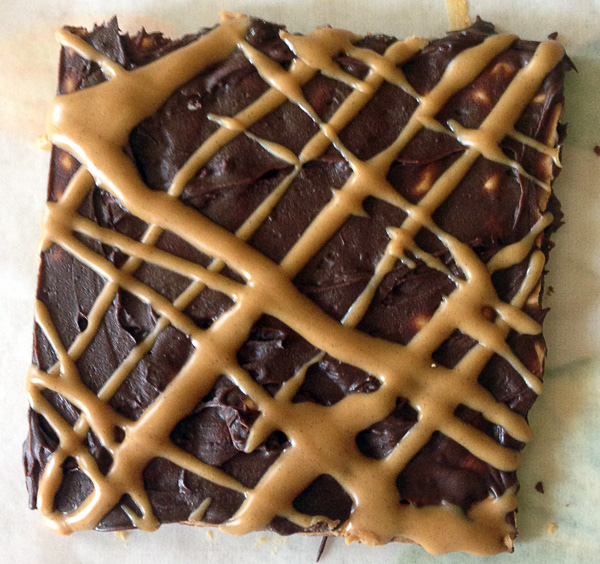
Peanut Butter drizzle anyone? Heat up in the microwave until drizzable.

Crushed Pecans and White Chocolate
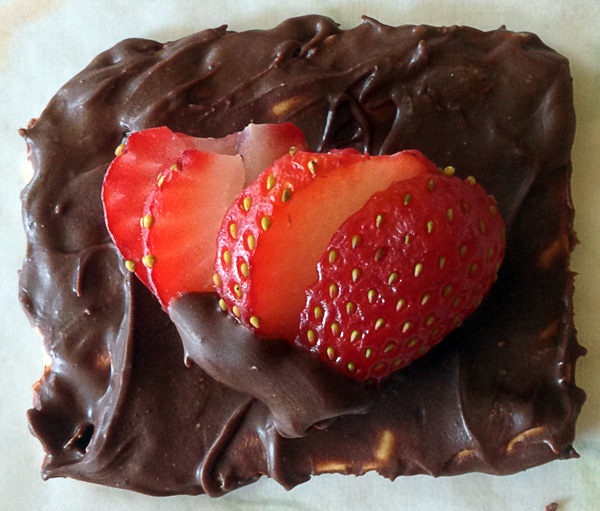
Fresh Fruit. I went with Strawberries.
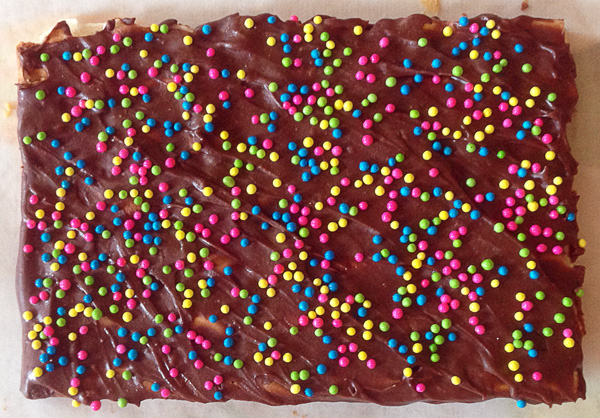
Nonpareils. Any color.
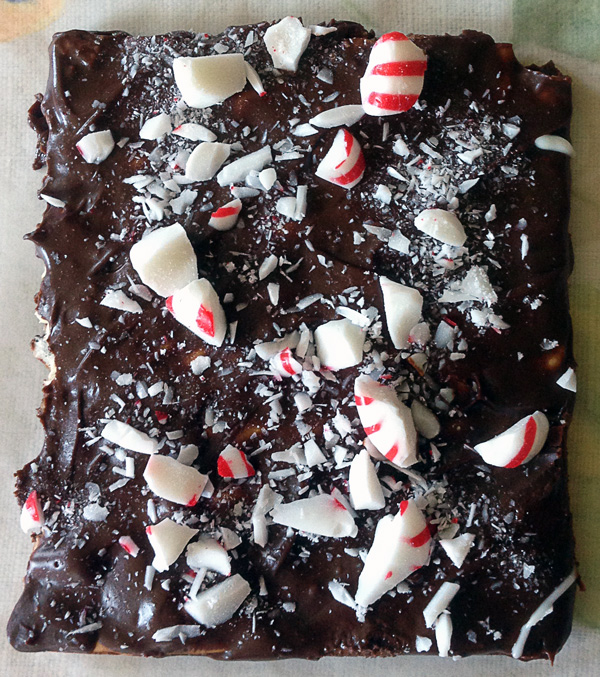
Crushed Peppermint Candies

More Matzah and some Kosher Salt
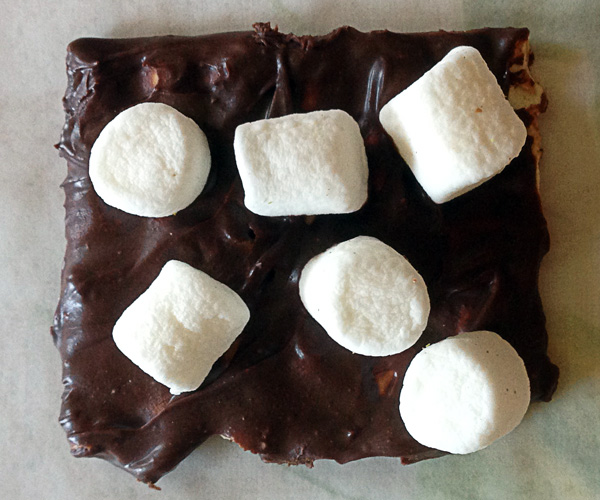
Mini Marshmallows
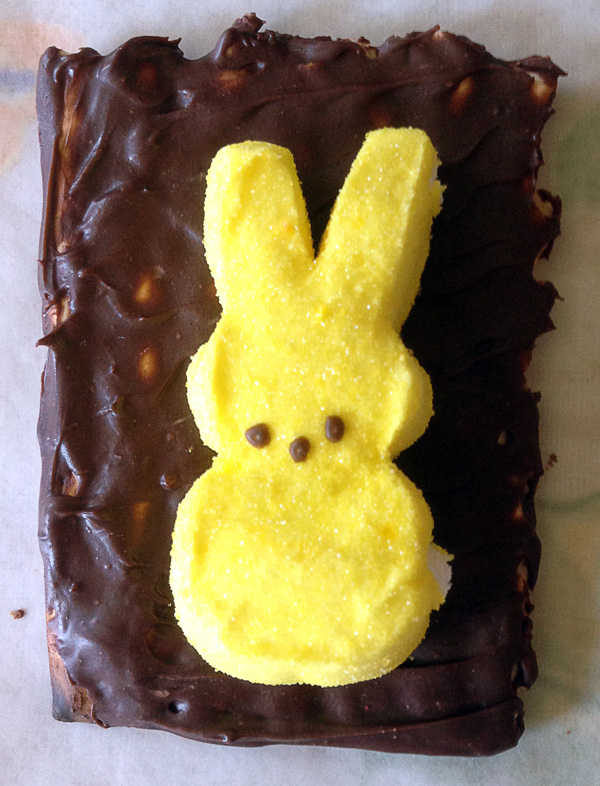
Peeps? I had plenty leftover from Easter.

Jellybeans? Yes. Jellybeans.
And put them in a basket for baby and me!
Shut up and just GIVE ME THE RECIPE!!
Ingredients
Matzah (enough for eating)
Chocolate (enough for coating. 1 cup chocolate chips will get you 5-10 large pieces of matzah coated)
Vegetable Shortening (for thinning chocolate, if needed)
Toppings
Make it
Melt chocolate in the microwave, using vegetable shortening to thin it, if necessary.
Using a spoon, coat one side of the matzah with your chocolate.
Top with whatever you want. The possibilities are endless!
]]>The Story
It’s the Big Game Weekend, and everyone is eating chips and dip, nachos, and wings. Your appetizer/dinner menu is pretty standard across the board, and it’s never going to change. Maybe one year someone will bring over guacamole, or maybe this year you’ll put some pulled pork in the oven for sliders.
But what do you eat for dessert?
Football and dessert never really went together, and I wanted to change that. So I made these nachos. With ‘homemade’ tortilla chips, and the trifecta of chocolate, peanut butter, and caramel, these are bound to please the most manly of men and the pickiest of kids.
Plus if you make them with gluten free white corn tortillas, you’re goooood.
My only regret is that I ate too many, and now I don’t want to move……..
Ingredients
Chips
10 Small white corn tortillas (Gluten Free)*
Olive Oil
Course Sea Salt
*Let’s make this clear that you can use the yellow corn tortillas if you want to add more color to your nachos or flour tortillas if you fancy. I thought that the corn ones crisped up better than their flour counter parts, and I found the white ones easier to see when they were done in the oven instead of the yellow. Pay attention to labels and ingredients on this item if you want it Gluten Free.
Chocolate Drizzle
1/3 cup Semi-sweet chocolate chips
Vegetable Shortening for thinning, if preferred
Peanut Butter Filling
1 cup peanut butter (smooth)
1/2 cup heavy cream
3 tablespoons granulated sugar
Caramel
1/4 cup dark brown sugar
1 tablespoon salted butter
1/8 cup heavy cream
1/4 teaspoon vanilla extract
YIELD: I made a small batch of these because you can’t eat too many. But double, triple, or quadruple the recipe depending on the size of your party.
The Detailed Guide
The Chips
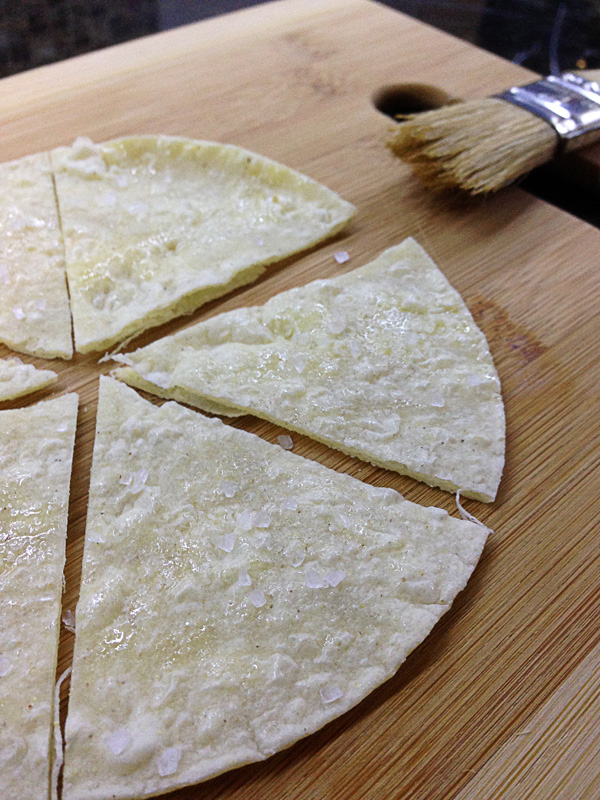
Take your tortillas and cut them into 6 pieces. Lightly brush them with olive oil. I did both sides for some, and then got lazy and only did one side for others. The difference was so minuscule. Sprinkle them with a pinch of course sea salt.
Bake these in the oven at 350° for about 15 minutes. Be careful not to burn them! And be careful to not add too many to the pan at once, or they won’t crisp up.
Let them cool on the pan briefly before transferring them off and cooking more.
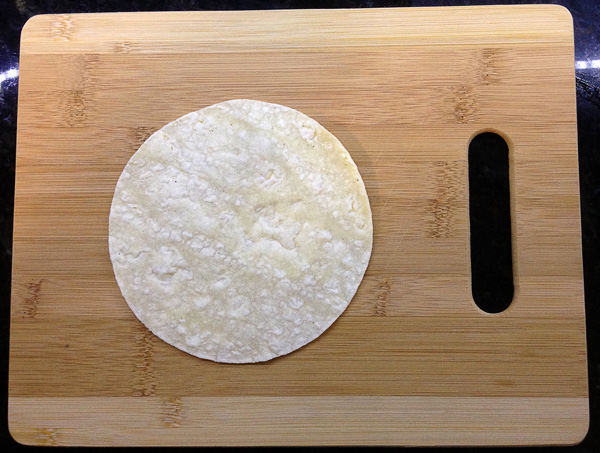
Ready for cutting
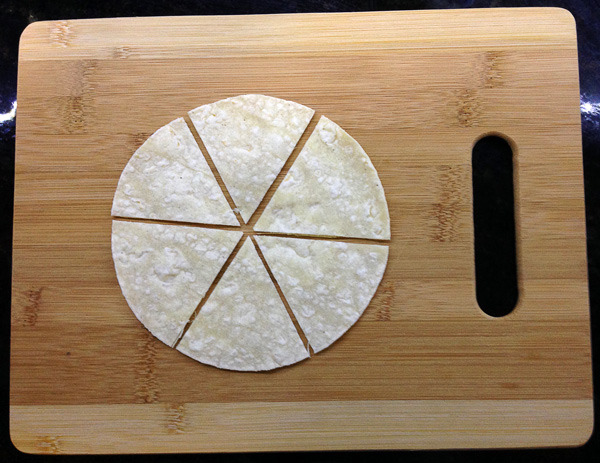
I found 6 slices to be the best size, but you can cut however many you like.

Just a touch of Extra Virgin Olive Oil will do.
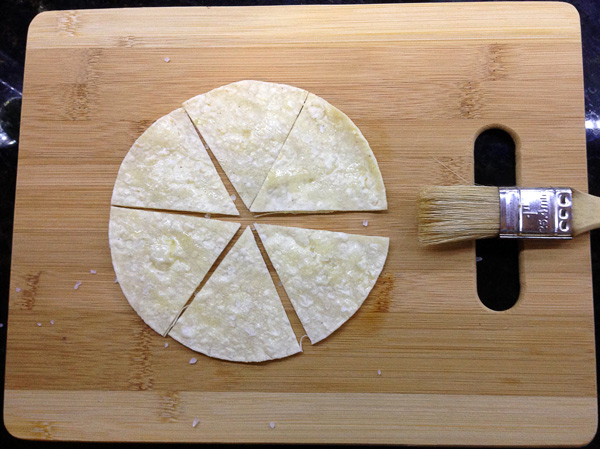
Brush brush brush and salt these babies.
Ready for the oven
Just so you know, you can use any size tortilla.
Peanut Butter Filling
While on the tale end of your tortilla batches, start making the peanut butter filling. Pour the heavy cream into a small sauce pan and then add the peanut butter and sugar. Adding the heavy cream first helps the peanut butter not stick to your sauce pan. Cook over medium-low heat, stirring frequently.
Depending on your stove, this may take 4-8 minutes. You’re done when everything is melted, it has thickened, and the mixture is much glossier than expected. The longer you cook it, the thicker it will become, so beware of over cooking.
Transfer to a separate bowl to make sure this doesn’t continue to cook while you make the caramel.
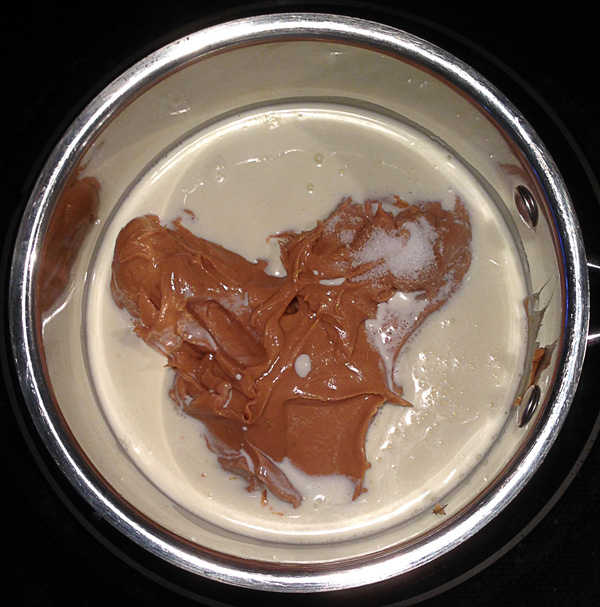
I love you too, peanut butter!
Glossy, cream, and warm peanut butter filling. Try not to eat it all before we are done!
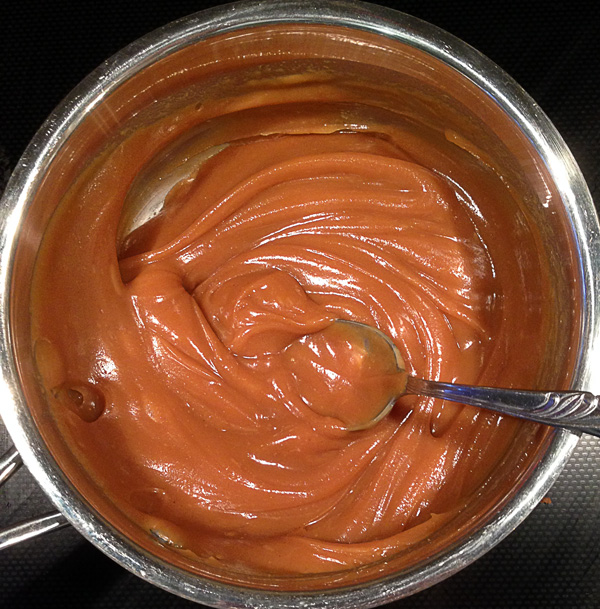
Caramel Drizzle
This is a faux-caramel since we technically aren’t caramelizing anything. But it’s quick. And it’s almost fool-proof to make.
Pour the heavy cream in a small sauce pan, and add in the butter, brown sugar, and vanilla. Cook over medium low heat, whisking occasionally, for about 5-7 minutes. Your caramel will get thicker. Once it begins to bubble, let it for 1 minute before removing from the heat. If your mixture was way too thin, keep it bubbling for a few minutes longer. Transfer to a separate bowl to help it cool and thicken even more.

Just 4 ingredients. Caramel made easy.

This baby is ready for cooling.
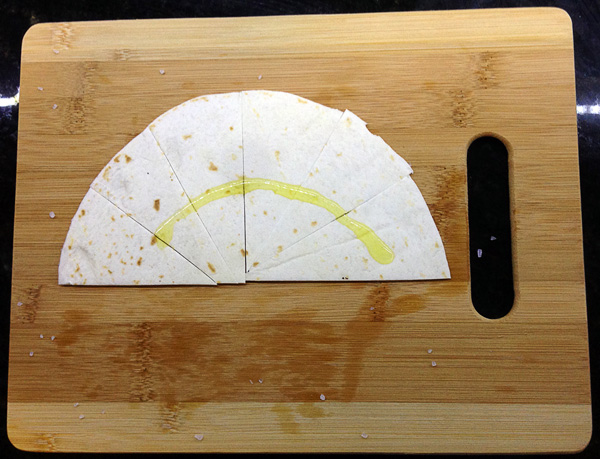
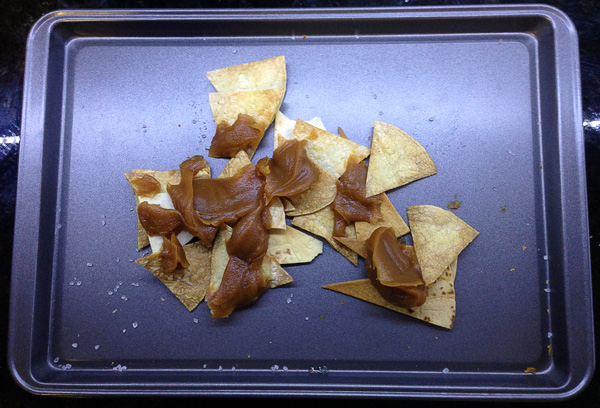
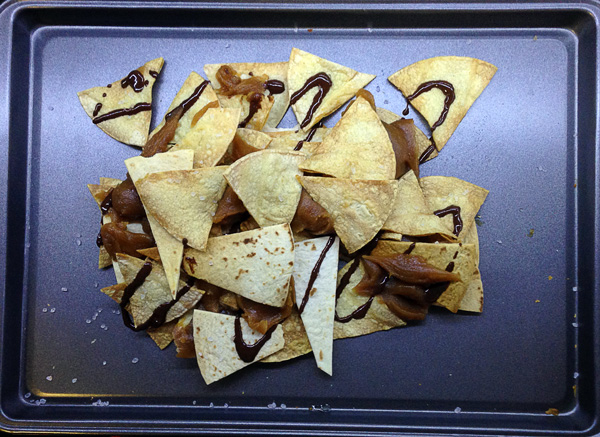
Assembling the Nachos
Now that your sauces are ready, it’s time to assemble these bad boys. Start by melting chocolate (microwave works best for this), thinning it as necessary for drizzling, and keep it handy.
Put your tortilla chips on your serving tray and glob on half of your peanut butter filling. Then, throw on some more tortilla chips.
Drizzle on half of your melted chocolate on top before dropping on the rest of the peanut butter filling.
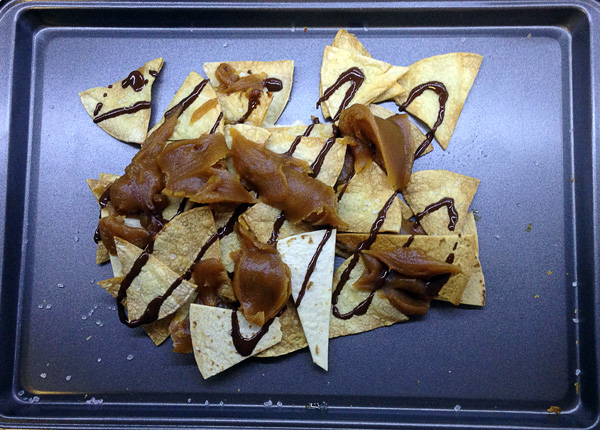
Then, add the rest of your tortilla chips. Drizzle with the remainder of your chocolate, and then drizzle with your caramel.
I didn’t use all of my caramel, so don’t feel the need to add more than you’d like. This caramel goes great with apples or any other fruit, so just refrigerate the remainder. Be careful when dividing the batch though for cooking the caramel drizzle. If you make the recipe too small, you won’t find a small enough sauce pan, so you’ll use one that’s too big and then you’ll burn it.
Finish it with a sprinkle of sea salt and serve this up to the hungry fans. No need for fancy plating, just plenty of wet naps!
Step 1) Put peanut butter filling on chips

Step 2) Put more chips on top
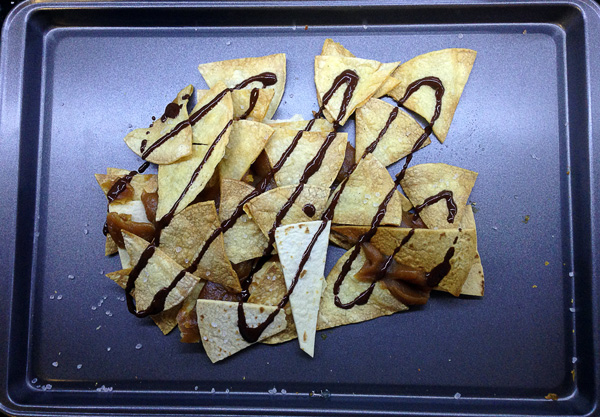
Step 3) Drizzle in chocolate. (See how the corn chips have so much of a better color than the flour ones?)
Step 4) More peanut butter, you say? Yessssss!!
Step 5) Use up the rest of your chips

Step 6) Drizzle in more chocolate because you can!

Drizzle caramel and then sprinkle with sea salt.
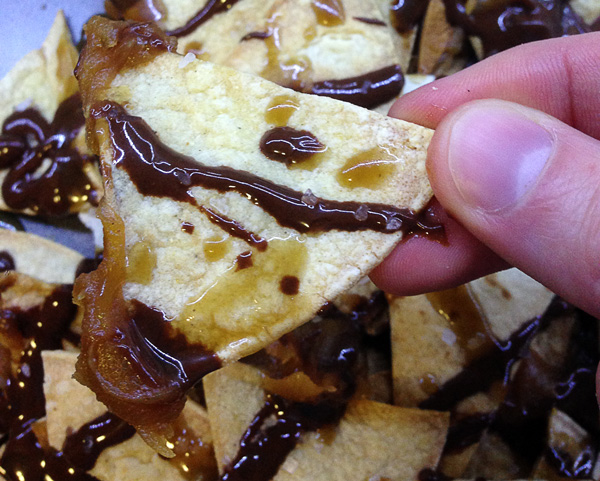
I’m practicing my hand modeling. And my self control to not just eat this.
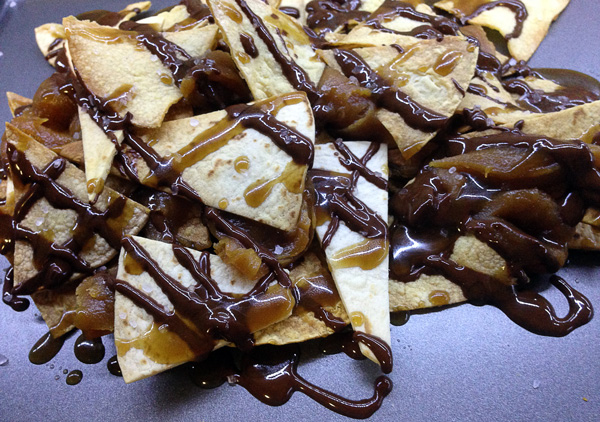
Pure Dessert Win.
Shut up and just GIVE ME THE RECIPE!!
Ingredients
Chips
10 Small white corn tortillas (Gluten Free)*
Olive Oil
Course Sea Salt
*Pay attention to labels and ingredients on this item if you want it Gluten Free.
Chocolate Drizzle
1/3 cup Semi-sweet chocolate chips
Vegetable Shortening for thinning, if preferred
Peanut Butter Filling
1 cup peanut butter (smooth)
1/2 cup heavy cream
3 tablespoons granulated sugar
Caramel
1/4 cup dark brown sugar
1 tablespoon salted butter
1/8 cup heavy cream
1/4 teaspoon vanilla extract
YIELD: I made a small batch of these because you can’t eat too many. But double, triple, or quadruple the recipe depending on the size of your party.
Make It
The Chips
Take your tortillas and cut them into 6 pieces. Lightly brush them with olive oil. Sprinkle them with a pinch of course sea salt. Bake these in the oven at 350° for about 15 minutes. Be careful not to burn them! Let them cool on the pan briefly before transferring them off and cooking more.
Peanut Butter Filling
Pour the heavy cream into a small sauce pan and then add the peanut butter and sugar. Cook over medium-low heat, stirring frequently. Depending on your stove, this may take 4-8 minutes. It should have thickened, and the mixture should be much glossier than expected. The longer you cook it, the thicker it will become, so beware of over cooking. Transfer to a separate bowl.
Caramel Drizzle
Pour the heavy cream in a small sauce pan, and add in the butter, brown sugar, and vanilla. Cook over medium low heat, whisking occasionally, for about 5-7 minutes. Your caramel will get thicker. Once it begins to bubble, let it for 1 minute before removing from the heat. If your mixture was way too thin, keep it bubbling for a few minutes longer. Transfer to a separate bowl to help it cool and thicken even more.
Assembling the Nachos
Start by melting chocolate (microwave works best for this), thinning it as necessary for drizzling, and keep it handy. Put your tortilla chips on your serving tray and glob on half of your peanut butter filling. Then, throw on some more tortilla chips.
Drizzle on half of your melted chocolate on top before dropping on the rest of the peanut butter filling.
Then, add the rest of your tortilla chips. Drizzle with the remainder of your chocolate, and then drizzle with your caramel (as much as you like. You’ll have extra).
Finish it with a sprinkle of sea salt and serve this up to the hungry fans. No need for fancy plating, just plenty of wet naps!
]]>The Story
Everyone knows someone who is Gluten Free. It’s not a fad or the new cool/hip thing to do, it’s a way of life for many. But sadly, a lot of dessert isn’t Gluten Free, since most desserts need several cups of flour.
That’s the beauty of the torte.
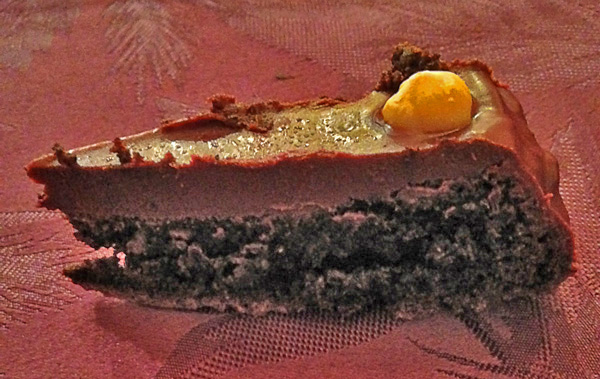
Tortes are one layer, very dense cakes. And typically, they have very little flour to begin with. This makes them relatively easy to substitute out the flour for something like almond meal. Plus, they are absolutely delicious and stunning to serve.
It should come as no surprise that I’ve made this several times for dinner with friends. Let me know how often you make it for your friends. And if you’re Gluten Free, and craving dessert, indulge.
Ingredients
The Torte
½ cup whole hazelnuts (plus 12 for decoration)
1 cup semi-sweet chocolate chips (about 6 oz)
½ cup salted butter, room temperature
2/3 cup, plus 2 tablespoons granulated sugar
5 eggs, separated
¼ cup almond meal/flour
¼ cup unsweetened cocoa
1/8 teaspoon cream of tartar
The Glaze
1 ½ cup semi-sweet chocolate chips (about 9 oz)
¾ cup salted butter, room temperature
1 ½ tablespoons light corn syrup
The Detailed Guide
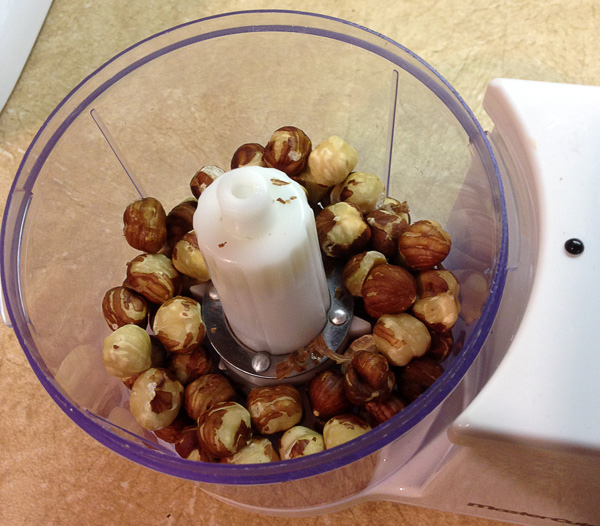
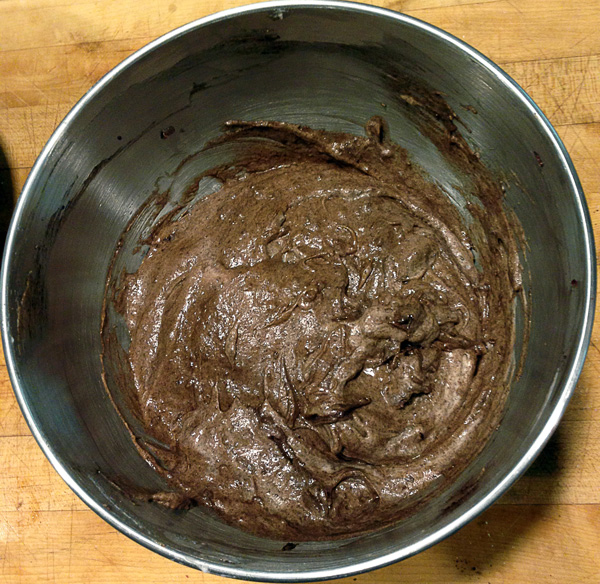
Start by heating the hazelnuts in the oven at 350° for about 5 minutes. They should be fragrant. If they aren’t, put them in for another 2 minutes. While still warm, place them in a kitchen towel and remove the skins. It’s not necessary to remove 100% of the skins, just do your best. Take the nicest looking 12 and set them apart for decorating.
Then, melt the butter and chocolate chips together.
I used the stove (melting the butter first and then adding the chocolate chips), but the microwave works just fine.
Meanwhile, using a food processor, finely chop the hazelnuts. Add in the 2/3 cups sugar once the hazelnuts are in tiny pieces and give it a couple more pulses to combine. Add this to your warm and melted chocolate and give it a good stir. Let it cool (a few minutes) by transferring it to a larger bowl (you’ll be adding more ingredients later anyway, and you’ll need the space).
Caution: These babies smell JUST TOO GOOD!

Finely chop these. You don’t want any large chunks!
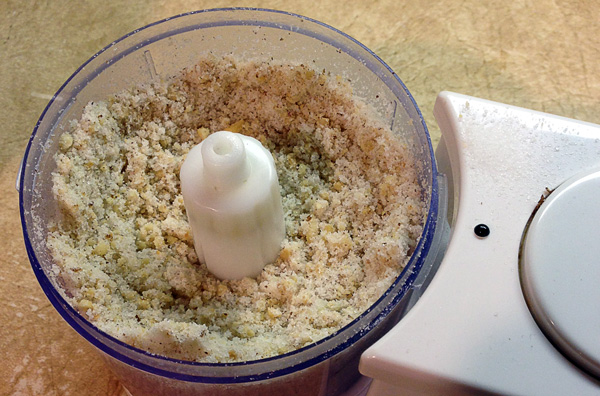
Add the sugar and pulse a few more times to combine and get rid of any large chunks.
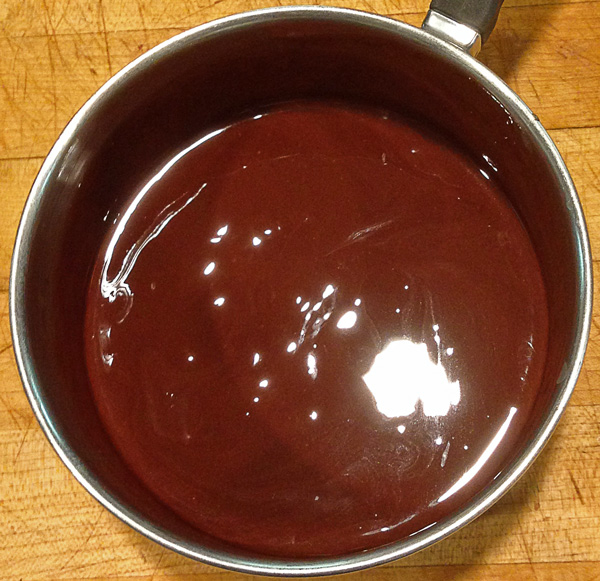
Smooth and velvety chocolate. Go ahead and have a taste. You’ve earned it.
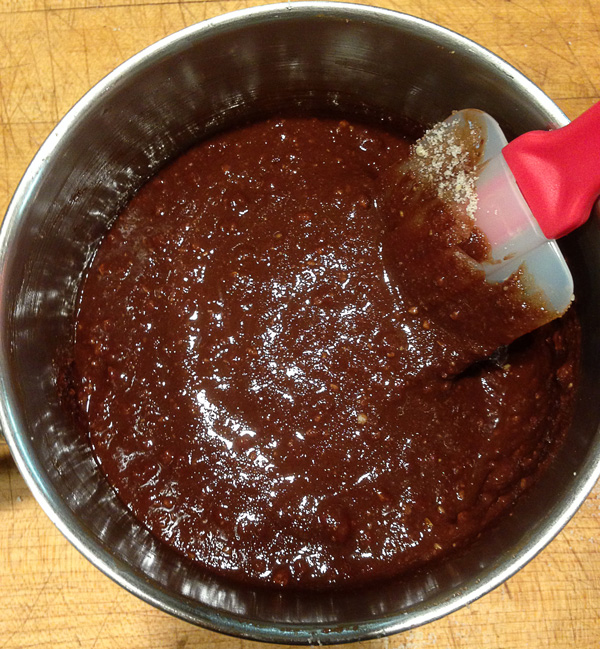
This is the step that marries the hazelnut with the chocolate.
Now that your chocolate is cooled (not hardened, but cooled), add in the egg yolks one at a time, beating well after each addition.
In a small bowl, combine the almond flour and cocoa with a fork (making sure that there are not any large clumps- almond flour can get a little clumpy). Add to the chocolate mixture thoroughly, making sure to scrap the sides. The mixture should be a thick batter- similar to brownie mix.

Almond meal can be made by you or just bought in the store. Store bought is just fine 
It’s going to be very thick and very dense. Don’t worry. We’ll lighten it in a bit.
In a separate bowl, combine the egg whites and the cream of tartar and whisk (or blend with an electric mixture with a whisk attachment) until a weak soft peaks. Add the 2 tablespoons of sugar and whisk until stiff peaks.
Note that when you add the 2 tablespoons of sugar, try to sprinkle it on, rather than just drop it on. This will cause less breaking of our air bubbles that we just created.
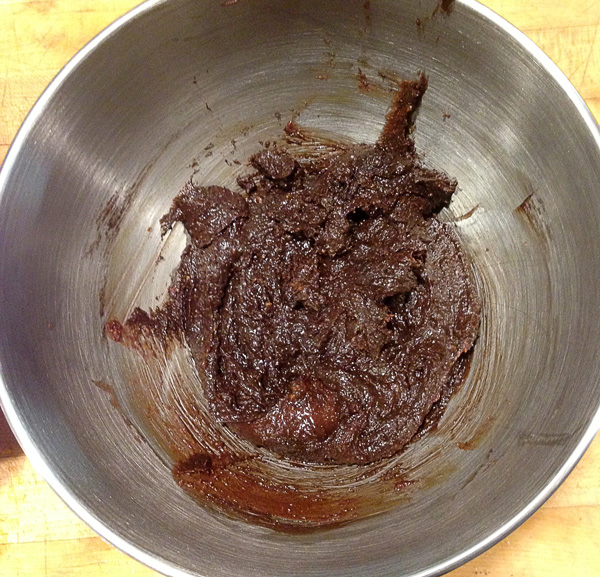
Once done, fold 1/4 of the stiff peaks into the chocolate mixture. Then, fold in the entire rest of the mixture.
Pour into a 9-inch rough springform cake pan that is lined with parchment paper and sided with baking spray. Put in the oven at 350° for 35-40 minutes, or until it passes the toothpick test (almost clean). I’ve had problems with springform pans leaking on me in the past. So I always put an empty tray underneath my springform to catch any potential droppings.
Cool in the pan on a wire rack, then transfer just to a wire rack.

Stiff peaks by hand doesn’t take much longer, plus you’ll burn those extra calories for when you have another slice of your torte!
Our batter is much, MUCH lighter now right?
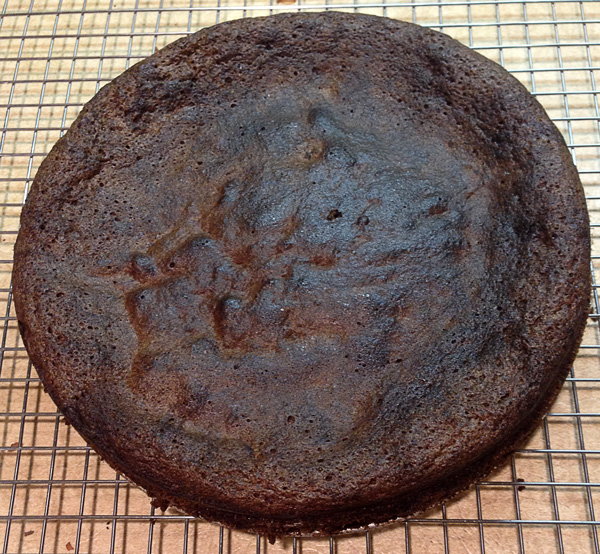
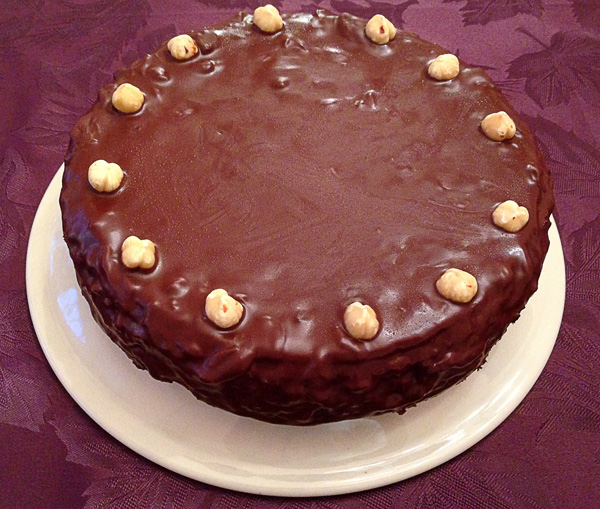
Don’t forget to flip this baby over before you coat it in chocolate!!
The glaze is a cinch. Melt the butter and chocolate together (in a pan or microwave). Then, add in the corn syrup. It’s the corn syrup that gives us a nice shiny glaze, so you can opt out for that if you want. Let it cool ever so slightly before flipping over the cake layer and pouring our chocolate over it. Make sure to get all the sides. Add those final hazelnuts for decorating and pop this baby in the refrigerator for cooling.
Enjoy with a large glass of cold milk. You’ll need it.
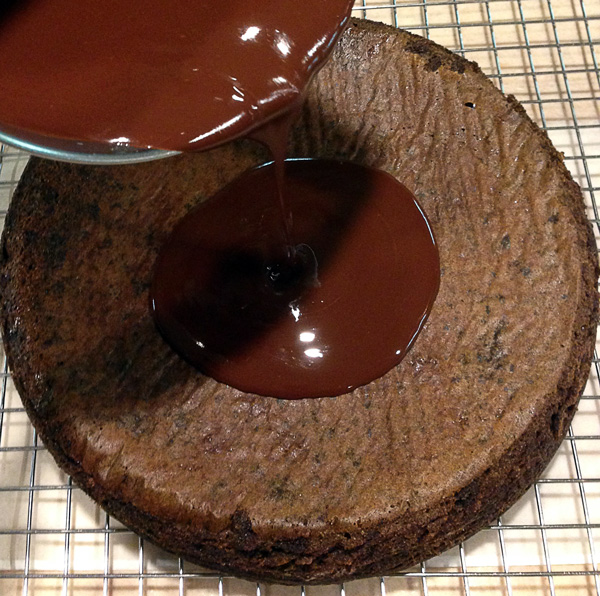
Smother this baby in chocolate. Cover the top. Cover the sides. USE. IT. ALL.
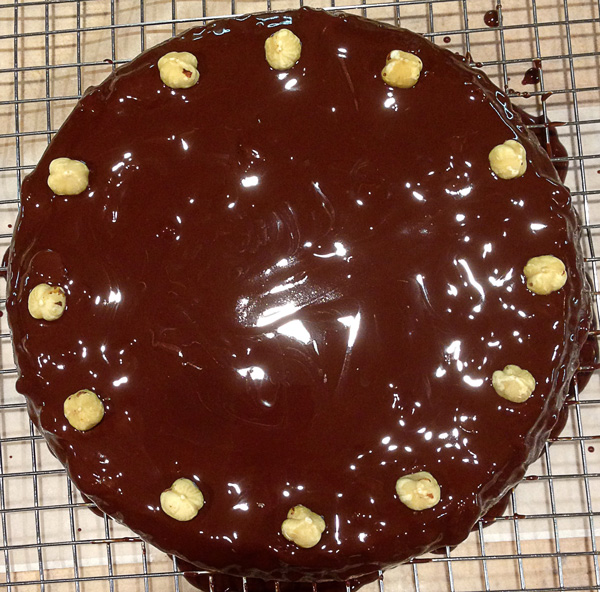
You can decorate as you see fit, but I went with a classic and simple look.
It’s a solid cake, and so you’ll be able to pick it up and handle it quite easily.
Gluten free people, welcome back to Dessert Land.
Shut up and just GIVE ME THE RECIPE!!
Ingredients
The Torte
½ cup whole hazelnuts (plus 12 for decoration)
1 cup semi-sweet chocolate chips (about 6 oz)
½ cup salted butter, room temperature
2/3 cup, plus 2 tablespoons granulated sugar
5 eggs, separated
¼ cup almond meal/flour
¼ cup unsweetened cocoa
1/8 teaspoon cream of tartar
The Glaze
1 ½ cup semi-sweet chocolate chips (about 9 oz)
¾ cup salted butter, room temperature
1 ½ tablespoons light corn syrup
Make It
Start by heating the hazelnuts in the oven at 350° for about 5-7 minutes, until fragrant. Take the nicest looking 12 and set them apart for decorating. Then, melt the butter and chocolate chips together. Meanwhile, using a food processor, finely chop the hazelnuts. Add in the 2/3 cups sugar and give it a couple more pulses to combine. Add this to your warm and melted chocolate and give it a good stir. Transfer to a larger bowl and let it cool. Add in the egg yolks one at a time, beating well after each addition.
In a small bowl, combine the almond flour and cocoa. Add to the chocolate mixture. In a separate bowl, combine the egg whites and the cream of tartar and whisk until a weak soft peaks. Add the 2 tablespoons of sugar and whisk until stiff peaks. Once done, fold 1/4 of the stiff peaks into the chocolate mixture. Then, fold in the entire rest of the mixture.
Pour into a 9-inch rough springform cake pan that is lined with parchment paper and sided with baking spray. Put in the oven at 350° for 35-40 minutes, or until it passes the toothpick test (almost clean). Cool in the pan on a wire rack, then transfer just to a wire rack.
Melt the butter and chocolate together. Add in the corn syrup. Let it cool ever so slightly before flipping over the cake layer and pouring your chocolate over it. Make sure to get all the sides. Add those final hazelnuts for decorating and pop this baby in the refrigerator for cooling.
Enjoy with a large glass of cold milk. You’ll need it.
]]>The Story
The Hanukkah season is upon us, and with that means some classic meals. Matzah ball soup. Brisket. And my favourite, rugelach.
I’ll admit that I’m a fan of pastries. Sure, cakes are great. And yes, pies are tasty. But pastries are where I have my most fun and are the desserts that I think are the best. You can pick up pastries and walk around the house with them, dropping little crumbs all over the place that you’ll subsequently have to vacuum up. You never feel bad about having “just one more”. And let me tell you, I always help myself to “just one more” rugelach.
While many recipes for rugelach dough is a cream cheese base, this one is a sour cream base. I find it makes the dough easier to deal with since it won’t be so sticky. Having a dough that is easy to deal with means that you won’t dread having to make them. We’ll also be making this in the food processor because I want to spend more time eating these than making them, and this just speeds up the whole process.
Ingredients
Dough
2 cups all-purpose flour
1 cup (2 sticks) salted butter
1 egg yolk
1/2 cup sour cream
Filling
Apricot Jam
Cinnamon
Nutmeg
Chopped Nuts (Walnuts, Pecans, whatever you like)
Granulated Sugar
Mini Chocolate Chips
Granulated Course Sugar
Egg White
The Detailed Guide
The Dough
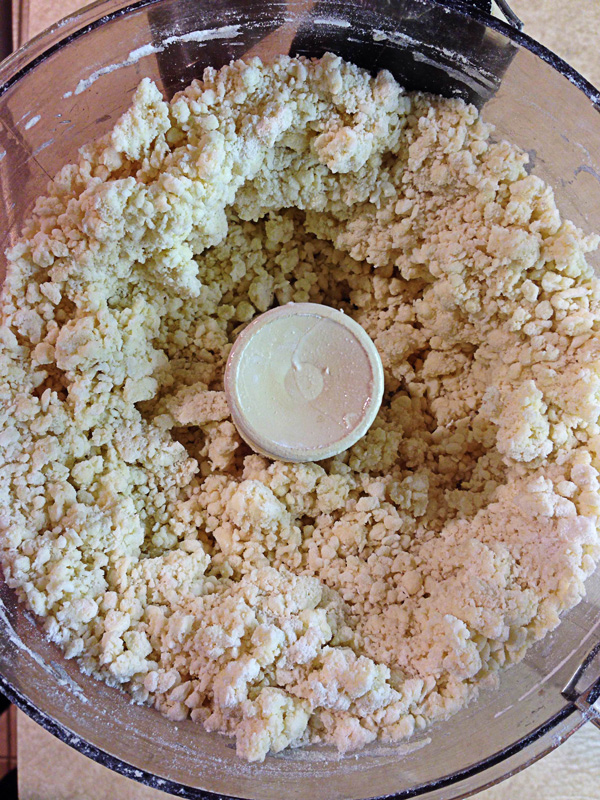
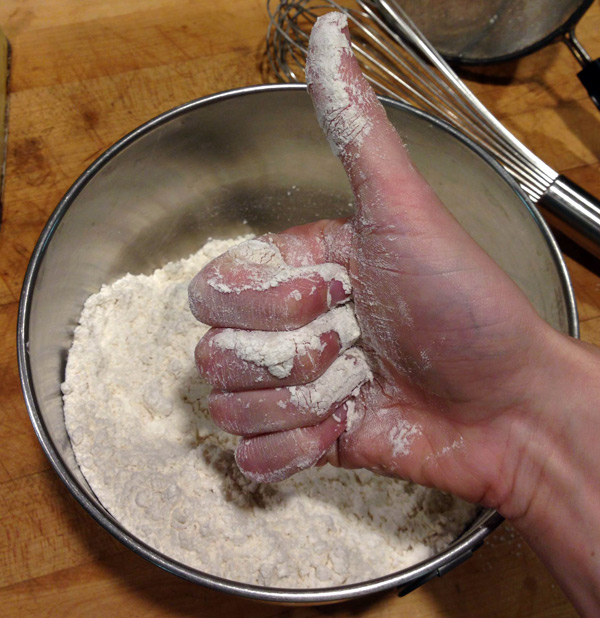
Cut the butter into tablespoon size pieces and put in the food processor with the flour. Pulse about 6 times for 2 to 3 seconds for each pulse. You should still see little pea sized pieces of the butter. That’s good! We’re going to try to keep those.
In a small bowl, combine the egg yolk with the sour cream together. Just use a fork to mix it together. KEEP THE EGG WHITE FOR LATER. Then, add it to the flour mixture and pulse a couple more times until combined. Once again, you’ll still want to see those pieces of butter.
It’s that butter that’s going to give the pastries a nice butter and (more importantly) FLAKEY crust.
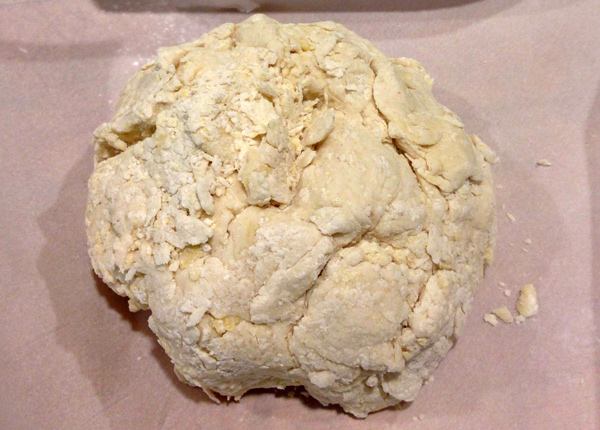
Turn the dough onto a piece of parchment paper. It’s going to be a very dry, clumpy, and loose dough initially. That’s fine. Use the parchment paper to help it stick together and then kneed it a couple of times until it forms to a dough. Flatten it somewhat, wrap in parchment paper, and refrigerate it for several hours or overnight.
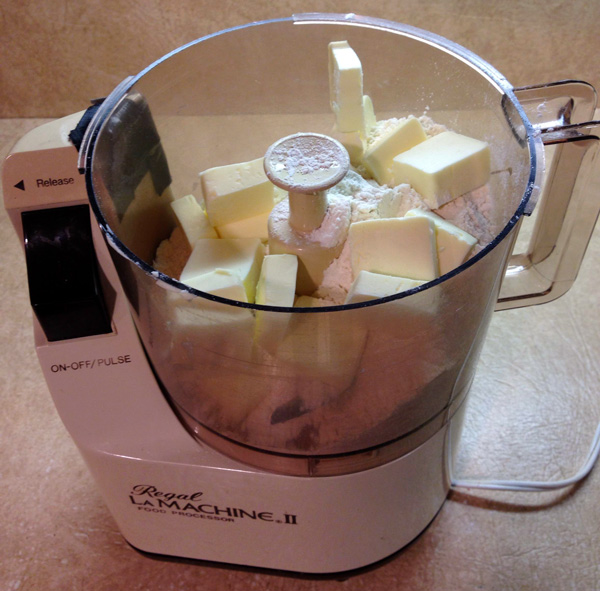
Food processor makes for quick and easy dough
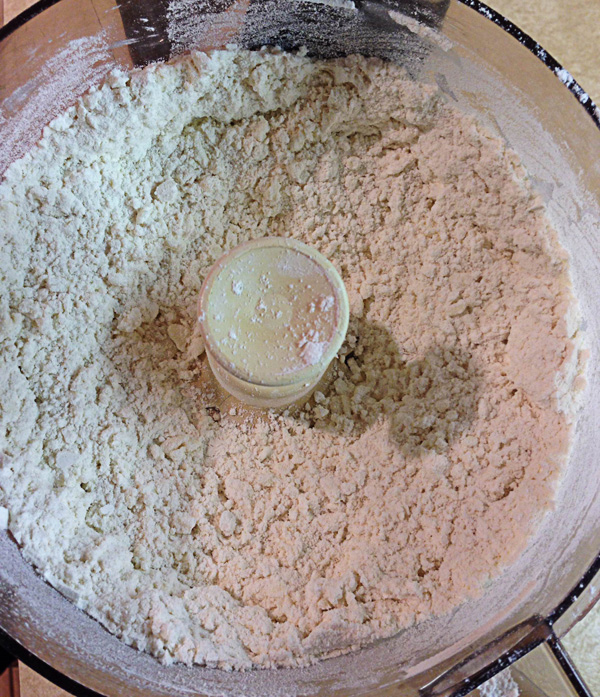
Pea sized pieces of butter are the key to a tasty, flakey crust.
Fun fact – Apparently it’s acceptable to spell it both “flaky” and “flakey”!
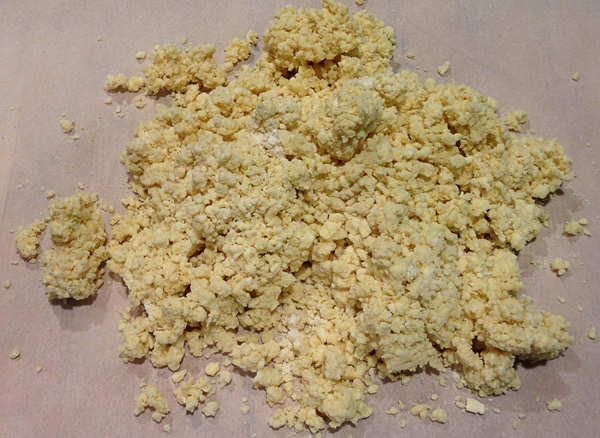
It’s going to be a loose dough to start
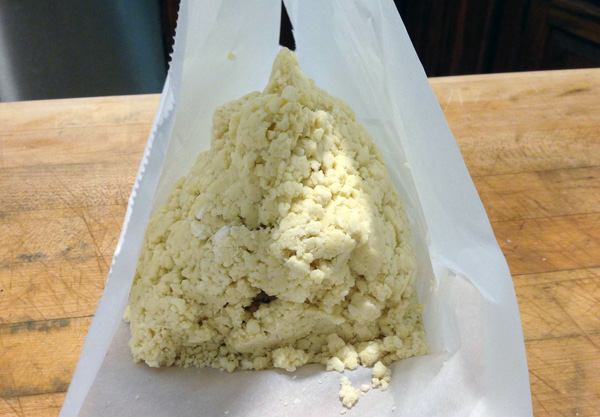
Use the parchment paper to form a dough.
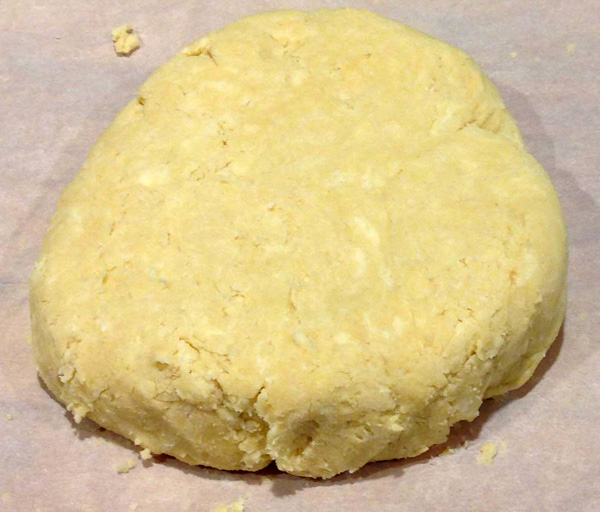
Ready for cooling in the fridge. LOOK AT THE BUTTER PIECES!
Time to Fill and Cook
It’s best to set up your fillings all in little bowls before you start this process so that everything is easily accessible. While you can edit this as you see fit (and I’ll post variations on the blog later on), the classic rugelach will have:
- Apricot Jam – You can use apricot preserves if you have that handy, but you won’t want to really utilize the chunks of apricots that are in the preserves.
- Some type of chopped nut- Depending on my mood, I’ve used pecans, and I’ve used walnuts. While the amount will vary depending on how much you like nuts, I’ve been happy with about a 1/3 of a cup.
- Cinnamon & Nutmeg – I keep these in the jars, since I find it easier to just sprinkle these on.
- Granulated Sugar – Since we are just asking for a sprinkle, I just use my fingers to dust.
- Chocolate Chips – About 1/3 -1/2 of a cup of either mini or finely chopped chips will do. Again, you can vary the amount.
- Egg white and Brush – Remember that egg white left over from before? Have that out, since we’ll use it to coat the top of the rugelach.
- Coating Sugar – Any sort of course or large chunk sugar will work for this. Put 1/2 of a cup in a bowl to start and add more as necessary.
- Remember that these amount will be making 4 rugelach pies (each pie has 12 rugelach to them). Pay attention to each pie while you make them, and adjust amount accordingly.
Now that you’ve got your ingredients out and ready, take your dough out of the fridge and cut into 4 pieces. Roll each piece into a circle about 8-10 inches in diameter. For easy rolling, roll between 2 pieces of parchment. Put the rolled out piece in the fridge while you are doing the others.
Once all of your dough is rolled out, take one of the circles out of the fridge because it’s time to make our rugelach pie. Make sure the dough isn’t sticking to the parchment paper. If it is, put it back in the fridge for a little longer. If good, spread 1-2 table spoons of the apricot jam on the dough. This may seem like a little stingy, but adding too much jam will only cause it to run out the sides. Then, sprinkle cinnamon, nutmeg, and sugar on top. A medium sprinkle of cinnamon, a light sprinkle of nutmeg, and a medium sprinkle of sugar will do. Then sprinkle your nuts and chocolate chips on top. It will now look like a pizza pie, but with dessert. You’ll want it generally evenly distributed on the pie, but you can play to putting the larger chunks of chocolate or nuts more towards to the outside.
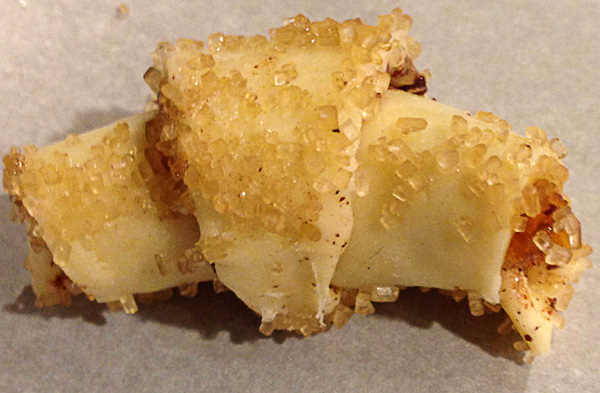
Put this back in the fridge to cool again while you make the other 3 pies. Once all are done, take your first pie out and cut into 12 slices with a pizza cutter. Then, take a slice, and beginning with the outside, roll the piece over itself to form the pastry shape. brush the top with the egg white, and lightly coat the entire outside (a little more on the top) with the course sugar.
Place each rugelach on parchment paper in a baking tray and set in a preheated oven at 325 degrees for 20-25 minutes (until golden brown on top). Remove from the oven and leave in the pan to cool for a few minutes. Then, remove to a wire rack to finish cooling.
Eat the entire first batch yourself, and then serve the other 3 batches to your guests.

Cut into 4
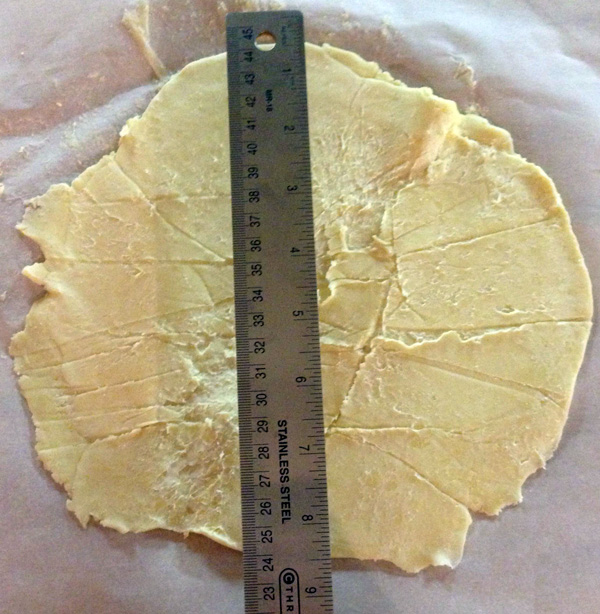
8-10 inches is ideal. The dough will be pretty thin.
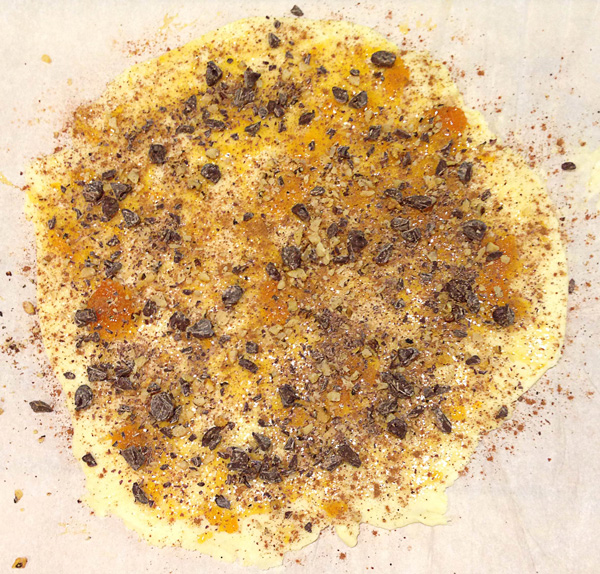
It’s a pizza pie with chocolate! CHOCOLATE PIZZA!
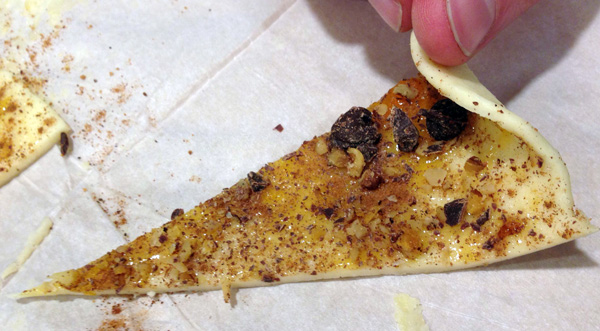
Fold from the outside in.
Rolled and ready for oven.
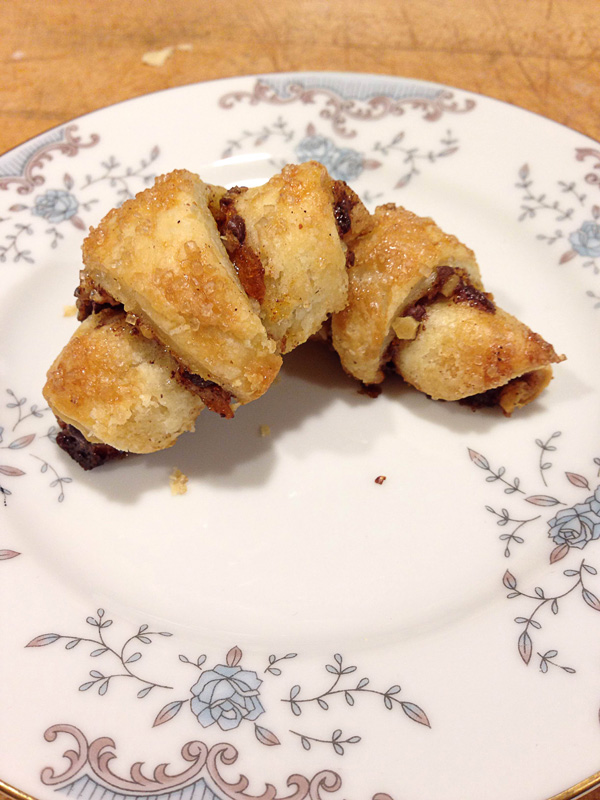
This picture is a lie. You will not eat just two.
Shut up and just GIVE ME THE RECIPE!!
Ingredients
Dough
2 cups all-purpose flour
1 cup (2 sticks) salted butter
1 egg yolk
1/2 cup sour cream
Filling
Apricot Jam
Cinnamon
Nutmeg
Chopped Nuts (Walnuts, Pecans, whatever you like)
Granulated Sugar
Mini Chocolate Chips
Granulated Course Sugar
Egg White
Make It
The Dough
Put flour and butter (table spoon sized pieces) in the food processor. Pulse about 6 times for 2 to 3 seconds for each pulse. You should still see little pea sized pieces of the butter.
In a small bowl, combine the egg yolk with the sour cream together. KEEP THE EGG WHITE FOR LATER. Then, add it to the flour mixture and pulse a couple more times until combined. Once again, you’ll still want to see those pieces of butter.
Turn the dough onto a piece of parchment paper. It’s going to be a very loose dough initially. Use the parchment paper to help it stick together and then kneed it a couple of times until it forms to a dough. Flatten it somewhat, wrap in parchment paper, and refrigerate it for several hours or overnight.
Fill and Cook
Set up your ingredients you’ll fill the rugelach with so you have them easily accessible: Apricot Jam, Some type of chopped nut, Cinnamon & Nutmeg, Granulated Sugar, Mini Chocolate Chips, Egg white and Brush, and Coating Sugar .
Now that you’ve got your ingredients out and ready, take your dough out of the fridge and cut into 4 pieces. Roll each piece into a circle about 8-10 inches in diameter. Put the rolled out piece in the fridge while you are doing the others.
Once all of your dough is rolled out, take one of the circles out of the fridge, Spread 1-2 table spoons of the apricot jam on the dough. Then, sprinkle cinnamon, nutmeg, and sugar on top. A medium sprinkle of cinnamon, a light sprinkle of nutmeg, and a medium sprinkle of sugar will do. Then sprinkle your nuts and chocolate chips on top.
Put this back in the fridge to cool again while you make the other 3 pies. Once all are done, take your first pie out and cut into 12 slices with a pizza cutter. Then, take a slice, and beginning with the outside, roll the piece over itself to form the pastry shape. brush the top with the egg white, and lightly coat the entire outside (a little more on the top) with the course sugar.
Place each rugelach on parchment paper in a baking tray and set in a preheated oven at 325 degrees for 20-25 minutes (until golden brown on top). Remove from the oven and leave in the pan to cool for a few minutes. Then, remove to a wire rack to finish cooling.
Eat the entire first batch yourself, and then serve the other 3 batches to your guests.
The Story
The inspiration I had for this dessert was a mixture of 2 things.
The first, was my neighbor’s engagement party. I needed to make something. But what? The hosting mother already had ordered a cake (and you never want to try to upstage an engagement cake!), and the sister was making her famous chocolate chip cookies (which just simply can’t be competed with). The theme to the party was also “Merlot”- both the color, and the taste of that delicious red wine. Our families have been close for a long time by proximity (living just across the street), and by our culture. We believe in spending simple times together – the best nights are spent gathered around the kitchen table, snacking on cheeses, and sipping on wine. We talk, we laugh, and we play stupid games and laugh even more. In fact, it was their family that introduced us to making our own wine. If the Italians got anything right, it was wine. And so I knew I wanted to do some sort of Italian dessert. Something classic, but something small. I wanted something pretty, but not a showstopper of a cake. Cannolis fit the bill. They are just the right kind of classy dessert that I was looking for, and they are something you can pick up and eat while chatting with family friends while leaning on the kitchen counter tops.
My second inspiration was the season. It’s been an unusually warm fall season here in New Jersey, and I for one, have been LOVING IT. The cool and crisp (not frigid) Autumn air has led to more than one occasion of just walking around looking at the leaves. The reds. The oranges- the Fall has a solid color palette. It also has great flavors – squashes, corns, butters. It’s the season that you can serve soup for dinner, and everyone is excited about it! But it’s also over-commercialized with pumpkin-spice and apple-spice everythingggg. I’m still surprised I haven’t seen Pumpkin Spice cereal yet in the foodstore (leave a comment if you have because I just HAVE to see that). Anyway.. I wanted something different. Something that says fall without being so noisy about it. And so I went with cinnamon. Most cannoli recipes have a little bit of cinnamon and allspice in them, but I’ve upped the spices to make the flavor of the filling just that more complex. Also pairing it with crushed pistachios gives this a nice rustic color that just brings in the season.
What you end up getting are little pieces of dessert that just taste like home. So what are you waiting for? There is a step by step recipe below, and you (YES YOU), can make these!
Ingredients
Shells
2.5 cups all-purpose flour
1 tablespoon granulated sugar
1/4 teaspoon kosher salt
2 tablespoons salted butter
1 large egg yolk
3/4 cup dry white wine
Filling
3/4 cups confectioner’s sugar
1 teaspoon cinnamon
1/4 teaspoon allspice
2 cups ricotta cheese
1/2 cup heavy cream
Other
Chocolate for dipping
Vegetable Shortening
Pistachios (chopped) for dipping
Oil for frying (vegetable or canola)
Cannoli forms
The Detailed Guide
Let’s Make the Filling – sort of..
The difference between ricotta cheese is huge. Whether we are talking about one brand of cheese versus another, or whether we are talking about whole milks versus skim milk, there is a different consistency in the cheese. Since the ricotta is the main actor in this dessert play, we need to focus a little bit on it. You want a nice and tasty ricotta, and you want that ricotta with as little water in it as possible. This is because it’ll be our filling, and a watery filling is going to make the shells all soggy. So check the ricotta cheese before hand. If it’s a watery one, wrap it in a cheesecloth (or just put it in a fine strainer), throw it in the fridge, and let it drain itself for a wee-bit. We can make the dough for the shells while it’s doing it’s thing. I lucked out and the food store had a sale on a ricotta that happened to be just the right consistency, and so I just started with the dough for the shells.
The Dough!
In a medium bowl, sift together the flour, sugar, and salt. Then give it a nice mix with a whisk. Remember that you want the sugar and the salt to be nice and evenly distributed throughout, so give it a nice mixing. Then, work in the butter with either a fork or your hands (go on, get messy!). The dough should be clumpy and little pea-sized pieces. Finally, pour in the white wine. I used a fork to slowly start to wetten the flour mixture. It’s going to seem a little dry, but keep mixing and it’ll get to it. Once a dough starts to form, take it out of the bowl, put it on a sheet of parchment, and kneed it maybe 3 or 4 times. The kneeding isn’t because of yeast (there isn’t any), but because it’ll help the dough become more…doughy. Now split it in 2, wrap in parchment or wax paper, and toss it in the fridge to cool.
I chose the messy way
Remember, the dough is a little dry.
Back to the Filling
In a medium bowl, mix together the confectioner’s sugar, cinnamon, and all-spice. I used the same whisk as before, since I didn’t want to clean more utensils, and I wanted to make sure that the spices were evenly distributed throughout the mixture. Next, drop in your dried ricotta cheese and stir with the same whisk. It’s going to clump up at first and get caught all in the whisk, but bang it against the side of the bowl a few times and muscle through. You’ll get a nice smooth mixture.
*The reason I use a whisk so much in this, is that I prefer my cannoli filling to be a little lighter than the usual and typical heavy and dense ones you may find. The constant use of the whisk helps aerate the filling.
In a separate bowl, beat the heavy cream until stiff peaks. You can use either a whisk attachment on a mixer, or just whisk it by hand (it’s such a small amount of heavy cream, that turning it to stiff peaks by hand takes less time than setting up a mixture- especially with a chilled bowl. Now, fold the whipped cream you just made into the cinnamon ricotta mixture so you’ve got a nice and light filling. Stick it in the refrigerator until you’re about to stuff the cannoli.

See? Nice and dry ricotta!
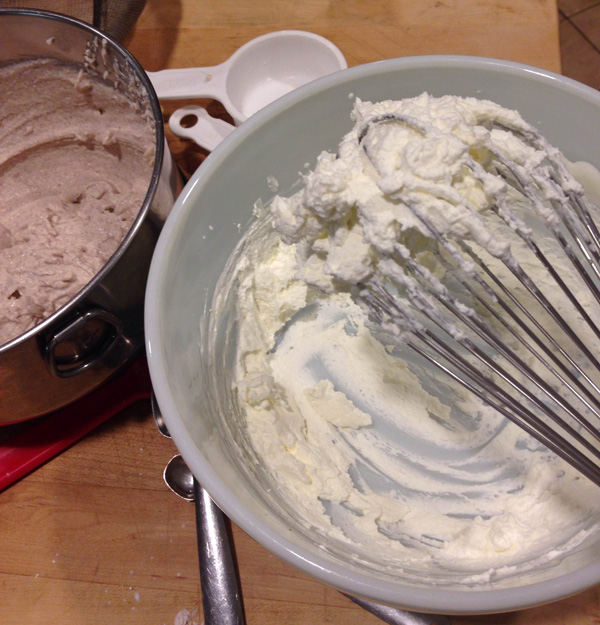
Stiff peaks to the right. Nice and smooth cinnamon ricotta to the left!
Time to Fry the Shells
First steps first, take a medium pot and place it on the stove with enough oil in it for deep frying. The amount is going to vary for whether you have a deep fryer, you use a normal pot, you use a wok, etc. Heat it to 360º and keep it there. If you are new to deep frying, this may be the most time consuming process. I find a medium heat works best but it varies from stove top to stove top.
Also, take out a dish and place a few paper towels on top of it. This will be where we place the shells once they are done frying so they don’t remain oily.
Now that the dough is chilled, take one of the halves out of the fridge and place between 2 pieces of parchment and begin rolling the dough so it is between an 8th and a 16th of an inch. The ruler I could find first measured length in 10th’s of an inch (weird, right?). I find a good rule of thumb, is when you think it’s thin enough, roll it a little more.
*You may find some recipes that have you flour the surface and the rolling pin. I stay away from that. The flour you added in the dough to begin with should really be enough to not need extra flour. Also, by flouring the surface, you are adding extra flour to just the edges of the dough. This makes for uneven baking/frying/cooking/etc. If your dough is still difficult to work with, chill it a little more.
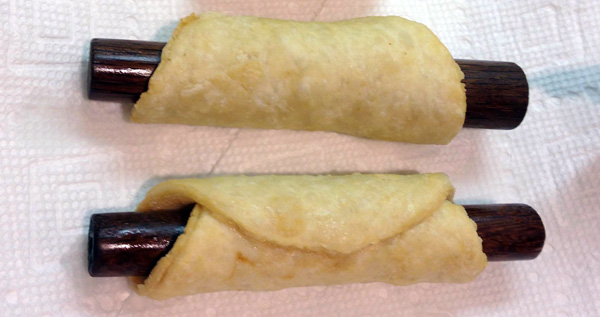
Cut the molds out with either a round cookie cutter or just a cup/glass with a good diameter. Some people like bigger cannoli than others. I find 3 1/2 inches in diameter is a nice size, but feel free to make them larger if your cannoli forms are thicker. Take your cut out and form it around your cannoli forms. Generally people use stainless steel cannoli forms. I use homemade wooden ones. With the left over egg white, lightly brush the cannoli closed and flare out the edges a little. This will help the oil cook the whole cannoli, it’ll make it easier to pipe your filling in, and it gives the cannoli that classic look. Place in the oil and fry for about 3 to 4 minutes. They tend to want to float, so keep them turning so that all of the shell spends time under oil. Once done, take them out with tongs and place them on the paper towels to dry. Depending on the size of your pot, you can fry more than one at a time. But remember, the more you’ll add, the cooler your oil temperature will drop to. So do be careful! Usually by the time you fry your next batch, you should be able to remove the shells from their molds. Hold the cannoli form in one hand and the shell in the other- give it a nice smooth tug and twist and it should come off easily. Repeat until all of the dough is used.
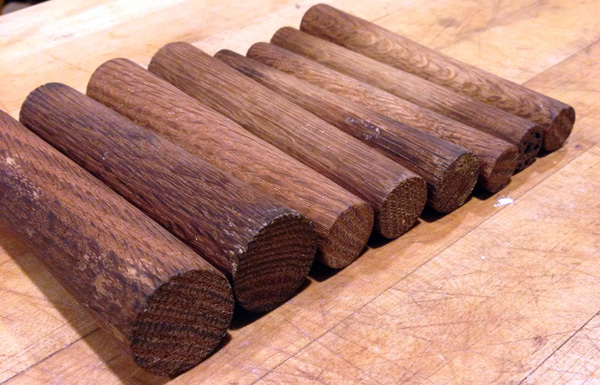
Homemade and wooden cannoli rolls. They vary in size and are browned from a lot of use.

Remember – 360 degrees is perfect for frying.
Let these babies dry on paper towels.
Cool enough to remove the forms.
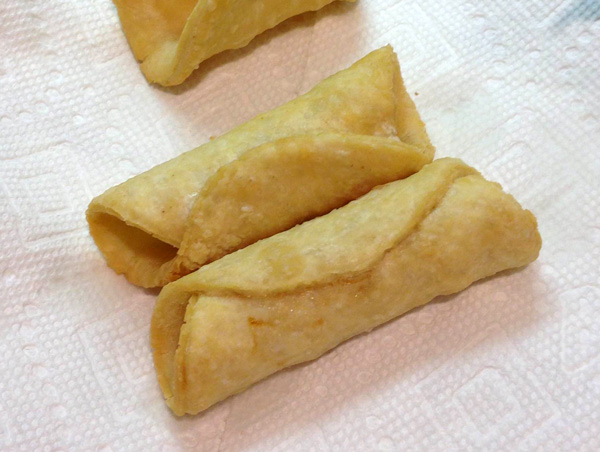
Pay no attention to the shell in the corner that didn’t stay shut…
Decorating!!!!
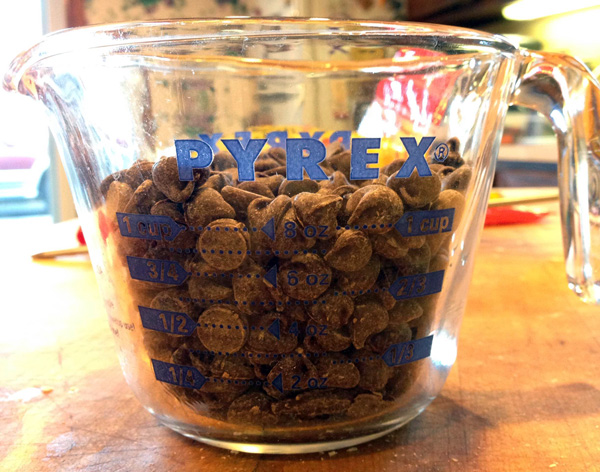
Melt the chocolate. Since we aren’t making a ganache or anything funky, melting in the microwave is the easiest method. Specifics depend entirely on your microwave, but you can’t really go wrong with 15 seconds and just repeating that until it’s melted. I used semi-sweet chocolate chips, and I used 1 cup of them. I also used 2 tablespoons of vegetable shortening which I mixed in the melted chocolate. This helps the chocolate thin out.
*Yes. I know. Chocolate is measured in weight and not volume, since you can buy large chunks of chocolate or use little tiny chips of chocolate and your volume will vary. I find the store brand semi-sweet chocolate chips are the easiest to work with and taste exceptional. So 1 cup. Also, this is just for melting and dipping.
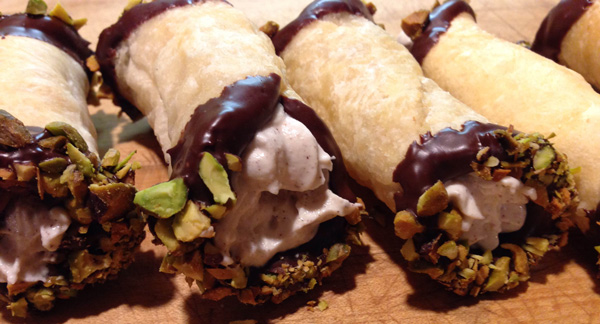
Finely chop up about a 1/4 cup of pistachios. Then, take a shell, dip it in chocolate on one side, and dip it in chocolate on the other side. Right afterwards, dip it in the pistachios and one side, and dip it in pistachios on the other side. Set on a wired rack for cooling. Do this for all the pistachios.
Right before serving (or bringing them over to your neighbors house), pipe the filling in the shells. Fill a piping bag with the cinnamon ricotta filling that was in your fridge, and pipe away. I used a large star tipped baking tip for mine. I also fill one side, and then the other. No need to try to fill the whole shell with one side.
Serve ’em. Eat ’em.
That’s all!
I used too much chocolate, but I don’t see that as a problem…
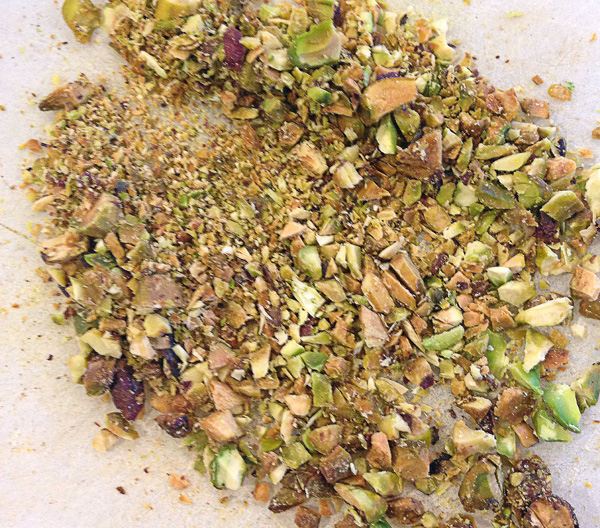
A mixture of big and small pieces works quite well together.
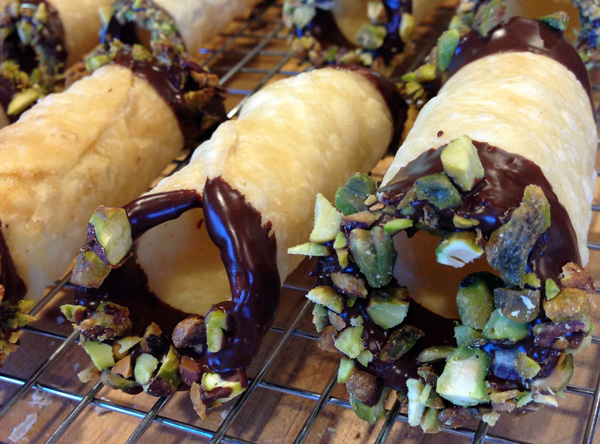
Lookin’ gooooooooood.
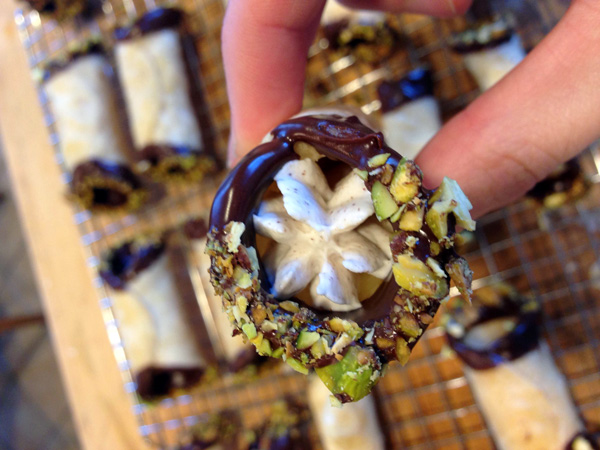
I used a star-tip, but you can use whatever.

All your ducks in a row.
You look good enough to eat! Good thing you are ready to eat!
Shut up and just GIVE ME THE RECIPE!!
Ingredients
Shells
2.5 cups all-purpose flour
1 tablespoon granulated sugar
1/4 teaspoon kosher salt
2 tablespoons salted butter
1 large egg yolk
3/4 cup dry white wine
Filling
3/4 cups confectioner’s sugar
1 teaspoon cinnamon
1/4 teaspoon allspice
2 cups ricotta cheese
1/2 cup heavy cream
Other
Chocolate for dipping
Vegetable Shortening
Pistachios (chopped) for dipping
Oil for frying (vegetable or canola)
Cannoli forms
Make It
Dough
In a medium bowl, sift together the flour, sugar, and salt. Work in the butter with either a fork or your hands. Finally, pour in the white wine. It’s going to seem a little dry, but keep mixing and it’ll get to it. Once a dough starts to form, take it out of the bowl, put it on a sheet of parchment, and kneed it maybe 3 or 4 times. Now split it in 2, wrap in parchment or wax paper, and toss it in the fridge to cool.
Filling
In a medium bowl, mix together the confectioner’s sugar, cinnamon, and all-spice. Next, drop in your dried ricotta cheese and mix.
In a separate bowl, beat the heavy cream until stiff peaks.Fold the whipped cream you just made into the cinnamon ricotta mixture so you’ve got a nice and light filling. Stick it in the refrigerator until you’re about to stuff the cannoli.
Fry the Shells
Take a medium pot with enough oil in it for deep frying. Heat it to 360º and keep it there. Take one of the halves of dough out of the fridge, place between 2 pieces of parchment, and begin rolling the dough so it is between an 8th and a 16th of an inch. I find a good rule of thumb, is when you think it’s thin enough, roll it a little more.
Cut the molds out of the dough. I find 3 1/2 inches in diameter is a nice size. Take your cut out and form it around your cannoli forms. With the left over egg white, lightly brush the cannoli closed and flare out the edges a little. Place in the oil and fry for about 3 to 4 minutes. Once done, take them out with tongs and place them on paper towels to dry. When they are a little cooler, remove the cannoli forms from the shells. Repeat until all of the dough is used.
Decorating/Filling
Melt the chocolate. If you need to thin it, add 1 to 2 tablespoons of vegetable shortening. Finely chop up about a 1/4 cup of pistachios. Then, take a shell, dip it in chocolate on one side, and dip it in chocolate on the other side. Right afterwards, dip it in the pistachios and one side, and dip it in pistachios on the other side. Set on a wired rack for cooling. Do this for all the pistachios.
Right before serving, pipe the filling in the shells. Fill a piping bag with the cinnamon ricotta filling that was in your fridge, and pipe away. I used a large star tipped baking tip for mine. No need to try to fill the whole shell with one side- fill one side, then complete it with filling the other.
Serve ’em. Eat ’em.
]]>